Thursday, December 30, 2010

October Afternoons Santas sack!


Ok forgive the quality and the kids in the background..... ya that one please forgive lol. Anyway yay a video!


It can be viewed on youtube at http://www.youtube.com/watch?v=8N6SYydYCso

Thursday, December 23, 2010

A gift for a friend


So my sister came up with this idea all I had to do was cut it with the cricut.... I think she will be getting a cricut for her birthday at the rate shes having me cut things for her lol. Anyway this was super easy to do and total cost was about $7 for the block.

Thursday, December 9, 2010

Teacher gift


Yes I am alive.... its not that i havent been crafty, Ive just been lazy about uploading pictures and posting to the blog. I have four teachers to make gifts for this year and didnt want to spend a lot of money. I bought these 6x6 tiles at lowes for about 70 cents each and the little stands at Craft Warehouse 40% off of $6 each. Not bad for a gift.

I love how it turned out and I am trying not to stress about the stand being a little too big for the tile..... trying.....

Wednesday, October 20, 2010

Monday, September 13, 2010

Car windows.....


My nephew called me up and asked me to make him a grizzly paw print for his car window...... oh ya and a Raiders one for the other side. I said no problem! Ok, maybe I shoulda charged him for the TIME it took to layer the three colors on the paw! Oh well I think it turned out amazing! As soon as he sends me a picture of it on his car I will post that too, but for now these pictures will have to do.

Friday, August 20, 2010

Growth Chart!!!


Two posts in one day wow! Maybe I should have saved this project to post tomorrow to spread the love, but I am so excited about this project I just cant! I have had this project floating around in my head for a while now, just needed to get the supplies and DO IT. I finished up the design on my gypsy and was able to get it cut out on one sheet of 12x24 piece of vinyl. I used an L on plantin school book and for the numbers used street sign (a favorite cart of mine). for the title I used Mickey font. I probably would have done the whole project in brown, but I ran out of brown so red it is :)

I got the board from lowes for $6 (it already had nice curved edges on it), paint $13 (a quart, but now I know I could have gotten away with a sample size paint can for $3) in Valspar Desert Fortress.

I love that this growth chart is longer than all I have seen, just wish I had done this when my kids were littler! Oh well I guess it will be ready for grandbabies.... those better not come for a LONG time either!


Just a few layouts


So sorry I have been missing for a while... just havent been crafting. I do have some new ideas floating in my head now and and am actually working on something right now that I hope to share this coming week.


These are just a few layouts I sat down and did the other day. Nothing fancy just simple pages. Sorry for the bad pictures... really need to clean up my space... and get off the computer! lol

Saturday, July 10, 2010

Wall Board for Sis


Well I made a plaque for my sister and her hubby. She loves the phrase "all because two people fell in love" I had a three foot board I got on clearance one year from Craft Warehouse and thought it would work well. Behind the phrase I put their names with a heart seperating them. Im not completely happy with the overlaying phrase..... I think its too high even though I measured a million times! Well see if the perfectionist in me makes me pull it up..... Im hoping not.

Tuesday, July 6, 2010

Birthday card box


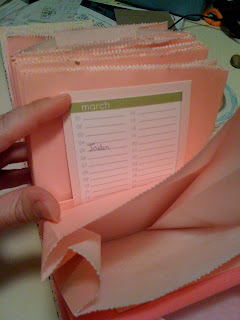
I was cruisin around various blogs....hoppin around like I tend to do now days and stumbled on http://paperphenomenon.blogspot.com/search?updated-max=2009-12-24T12%3A59%3A00-06%3A00&max-results=7 (one day Ill figure out how to have it one word to click sorry). Anyway, scroll down and she made the cutest recipe box. I then jumped over to the tutorial she had linked on her site that gave step by step instructions on how to make the boxes. Youll find that here.... http://www.youtube.com/watch?v=h0cl_ep9D0I. Paper Phenomenon also has a really good tutorial. Ok, so I made the box according to the youtube video but didnt like the front and back chipboard pieces not being the same length when completed. I then had to change some measurements up to fit the bags I got at wal-mart. Long story short, I made three boxes and one went in the trash lol. The first one is the polka dot pattern with different lengths for the front and back and the other one is glitter paper from my minds eye that worked. The third.... well.... ya.

Supplies needed are:
red line tape or scor pal tape (I think thats the name)
chipboard (I bought a package of 5 sheets for about $6, nice heavy weight)
Pattern paper, 2 sheets
velcro circles
cricut (optional)
stickles (optional)
Trimmer
paper bags (found mine at Wal-Mart in the craft isle for $1.50)
I used 12 bags, one for each month

My idea behind this is to make cards in advance and place them in the bag ready to go for that person. I had a piece of the KI memories calendar paper that I had been hoarding and this project was perfect for it. Feel free to ask for more details.

Thursday, July 1, 2010

Throwback Thursday #2


Emma over at My Creative Time is at it again with the throwback Thursday challenge. The cartriidge this week is New Arrival and the theme is Baby. I dont have that one so decided to use Doodlecharms since that was last weeks cartridge and I didnt get a chance to play last week. So here is my simple card for the challenge. I used the cuttlebug and some scrap paper to complete this quick card.

Ribbon Storage


Over at Creative Critters Cricut Club blog she asked us to show how we store our ribbon for a chance to win..... ribbon! Yay we always need more of that! I store my ribbon in these glass containers from wal-mart sorted by color. They are on top of my expedit in my scrap closet. They look pretty... well they looked prettier in my old scrapbook room, but they look good and are very functional.

My Pink Stamper challenge


So I guess I am starting to participate in blog challenges! Its fun plus there is the chance to win... always a good thing. I love My Pink Stamper too! The challenge was to use pink, orange brown and green on a project. I had left over pieces from the pictures I made for Tyler that would work perfectly for this challenge. The stamps are a set from the dollar ones... ya I own a few of those too.... a few lol. cloud and tree from the cricut and border punch is EK.

All together now!


So I thought it might be nice to see all the pictures lined up to get an idea of what they might look like on the wall (minus Kelseys boa.... no its not mine lol). So I think they look good... kind wanna swap a tree out with another tree on one picture but I am telling myself to leave them alone..... hopefully I listen before I ruin them.

Tuesday, June 29, 2010

Tylers Third Picture


Title says it all. I thought the picture with only one tree seemed a little bare so I added another tree.....

Sunday, June 20, 2010

#2 and throwback Thursday


Heres a second picture I did using Paper dolls cartridge, Going Places, and Create a Critter. I also did this for My Creative Times blog challenge for a chance at Peechy Keen stamps!
*updated with a couple better pictures :)

Tuesday, June 15, 2010

Tylers room


So I feel a little bad.... the youngest gets the short end of the stick. I re-decorated Kelseys room, Jaiden got new furniture and poor Tyler didnt get anything new...... I decided to make him some pictures to hang on his walls instead of spending the money right now to buy them. I used a wood 12x12 frame I had bought months ago for another project I never did and then used paper from my stash, pop dots, and ink... oh yah and of course the cricut and the cartridges Going Places and Everyday Paper Dolls (such a cool cartridge even if you dont like paper dolls). I love how it turned out and will be making two more for his room soon.

Cuttlebug!


Ok so I took the plunge and ordered the cuttlebug.... I blame all you bloggers out there that use this on so stinkin cute projects I just HAD to get one! lol Anyway, it came with a ton of really cute versatile folders and they ran thru like butter. Kelsey loved this and no longer wants to use her hard to roll cuttlekids.

Me? Makin cards!


I dont know whats happening! I really like making them....and so does Kelsey. Quick projects that I can use more of my cartridges too. LOVE Create a Critter! I may like owls too.....

So on the ice cream card I used glossy accents on each layer to give it a little shine and used pop dots as well.... have I mentioned I really like pop dots now? This card used the sweet treats cartridge.
Kelsey made this card for her Aunt using her cuttlekids all on her own. I love that shes getting crafty!
.